


Halloween for Try it on Tuesday
Hello from me to “Try it on Tuesday” for their Halloween theme.
OMG! Do you know when was the last challenge I entered?
9th March 2016! Whaaaaat!
And it was for Try it on Tuesday….spooooooky! 😂

Been too long. But a combination of trying to earn a living and being in constant pain for the past 3 years put paid to many things.
Anyhoo, still working but not for as many days and thankfully my pain, which was predominantly from rotator cuff injuries to both arms (one following on from the other) has ceased….hallelujah!
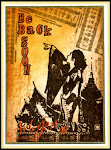
Smootched background of Paperartsy Fresco Paints with stamped images from Paperartsy, Stampotique and T!m Holtz.
Thanks for looking and happy stamping :)
xoxo Sioux


