


.JPG)


 This was my win on Tim's 12 tags of Christmas givaway this year. I am so lucky to have these and will be making something as soon as I can although for the past 3 days I have been suffering with the dreaded cold bug and not done much at all. The posts in the past few days had all been set up before and I only had to crawl to the computer to post them!!! So much for having some free time to craft. The best laid plans?
Monday, 29 December 2008
12 Tags of Christmas Present
This was my win on Tim's 12 tags of Christmas givaway this year. I am so lucky to have these and will be making something as soon as I can although for the past 3 days I have been suffering with the dreaded cold bug and not done much at all. The posts in the past few days had all been set up before and I only had to crawl to the computer to post them!!! So much for having some free time to craft. The best laid plans?Sunday, 28 December 2008
Christmas Traditions
 I love to go out to a local spot where there are lots of berry laden bushes. I have a great time cutting a big bunch of greenery and red berry delights and making them into a Christmas bouquet for the front of our house. I find it easier than faffing about with a circular wreath! I went last Sunday and made this to hang at the front of our house. The holly and the ivy were both from my back garden but unfortunately my holly never has any berries! Hopefully the bouquet will last into the New Year and up to 12th night.
Arty best wishes
Saturday, 27 December 2008
Arty Girlz Challenge # 66 Home Art
 12 Days of Christmas
Thought I would post this as my entry to the challenge this week at Arty Girlz. Can't begin to pretend I just made it but I love it and it has been appearing every year at Christmas for about 7 years. The panels were a piece of quilting material that I cut out and folded around a stiff cardboard base layer. They were padded out with quilting wadding and glued. Each panel was attached to the next with a strip of gold sparkly ribbon and the whole thing hangs from a wooden rod with decorative wooden beads on each end.

Friday, 26 December 2008
Santa Hat Freebie
 Would you like to make a Santa Paws card for next Christmas? I have made the hat available as a download, just click on the image to go there. It is a png file so there will be no nasty white background if you are going to use it digitally. It was designed at approx 6 x 3.5 cm but you can obviously make it larger or smaller. Enjoy, but please read the copyright rules before downloading.
Thursday, 25 December 2008
Merry Christmas - Santa Paws
 I know this is not a new idea but the recent inspiration came from Katy on the Craft Stamper blog here. It is really difficult to make a card for DH without him seeing it in the process so inevitably they have to be a bit on the quick side. This hybrid card is one of they!
Again adapt & create came into play. To make sure the hat would be the right size when I printed it out I drew it in my Serif programme over the top of the picture of Fitzgerald our beautiful cat (although in this pose he is looking a little disdainful!). I pasted the image to a blank page, printed and cut out then I added glitter all over the red part and when it was dry I attached cotton wool with glue. The picture of Fitz was layered behing a ready done digital frame that was a freebie from Two Peas in a Pod here called Berry Days and I added the wording to the white area of Fitzs' fur and printed this out onto pearl photo paper (I prefer this but ordinary is O.K. too). If you have looked at my earlier post with the "Heartfelt Christmas Wishes" card you will recognise the papers that the whole was matted and layered onto. Job done.
Here he is digitally too!


Wednesday, 24 December 2008
Artsy Challenge - Tim Holtz
 This tag card is for one of our best friends who is taking early retirement this week. Lucky him! The inspiration for this definitely came from Tim Holtz 12 tags of Christmas this year and also his monthly posts along the way throughout the year, so thanks again Tim. Although not Christmasy I am entering this on a new challenge site I found today at Artsy, quite opportune as I only finished the tag yesterday and took the photo's.
 I tried the resist crackle glaze technique where you stamp over the top using Distress Ink and wipe away the excess with a water soaked cloth. I think this is THE most fantastic effect and I can see me doing this to death I love it so much! I used one of the stamps from Paperartsy again that came with the Craft Stamper subscription and this technique allowed me to loose the image of the man and keep a bit of the writing and the pen nib. I did the same with the script stamp for the background. AB FAB.
Apart from the crackle paint (fired brick), distress inks (walnut stain,scattered straw,spiced marmalade) acrylics (espresso,butterscotch) and alcohol inks (copper mixative,raisin) there is nothing else by Ranger! As always, and I am sure many of you are just the same, I don't have much money left over every month to spend, spend, spend, although I could easily get carried away given half the chance! So I had to adapt & create. No Heidi Swapp clock face or ghost pieces? I stamped a pocket watch stamp (luckily I had a freebie from a magazine) onto a piece of crackled effect paper and stamped the same image again using Staz On onto a piece of plastic that was an outer cover on some packaging. Overkill on the packaging front but I recycled it so I feel better. No metal cogs and pointers? I had some chipboard arrows (I nearly had to make from scratch then remembered these) that I coated with some espresso acrylic paint but did not like the colour and needed to brighten it a bit so rubbed some gold paste over the top. The cog wheel was hand cut and painted with butterscotch acrylic.
I don't know about you but I don't have an endless supply of wooden rulers, mores the pity, so I pasted a piece of paper with an image of a ruler (K & Co) onto some chipboard and inked the edges, added a metal word sentiment and attached with some brads.
 I found some alphabet stamps on offer at my local craft shop (a bargain at £1.00 each) so I bought two different fonts one as capitols and one lowercase. I stamped the "Time On Your Hands" with a mixture of these onto card that had already had the tag treatment and cut them out. Then I covered them with Anita's 3D gloss (similar to Glossy Accents) to give them a glazed epoxy look. Again, I really must do this more often. By the way, please be sure to use a waterproof ink such as Archival or Staz On for the wording as the glaze will make other inks run! I was going to leave it there but felt it needed something in the lower corner so I distressed up a swirly metal paper clip with some copper and raisin alcohol ink and attached, I also added a bit to the cog like eyelet (We are Memory Keepers) to knock back the brightness.
Looking forward to some free time at Christmas to do some crafting. Hope that Christmas is all you wish it to be. Have an Arty one.
Tuesday, 23 December 2008
Lisa Vollrath Christmas Freebies
I am adding a permanent link under Arty Inspiration in the side bar to Lisa at Ten Two Studio who is giving away some great digital images over the Christmas period. Off now to download a few myself. Have finished work today so am planning to add something to my blog everyday till I return to work on the 2nd when I suspect it will tail off again!
American Package

This arrived today. I can't describe how exciting this is! I am going to save opening it till Christmas morning. HONEST! I began to imagine how far it had travelled to get to me and it starts to make the mind boggle. I've never been to America as I used to have a fear of flying, why do they say that when really its a fear of crashing that gets you, now I don't have the fear but I don't have the funds so perhaps its not my destiny.
Monday, 15 December 2008
Mystery Bone Folder

Well here is the "bone folder" I use. Can anyone shed any light on what it's purpose was in it's former life? The edges are all rounded and smooth and there is some wording stamped into it "FAUDEL'S" and stamped at one end with "1in 3/8" which it actually measures across and it is 8 and 4/8 inches long. It is made of wood and makes a great "bone folder" as its age has obviously added to the smooth edges it has. Hope someone can help :)))
Sunday, 14 December 2008
Card Designer of the Year 2008
The results are in & verified - ooh sorry sounds a bit like Strictly - from Simply Card & Papercraft Card Designer of the Year competition and what do you know, I came a close second (along with 9 others LOL:) ) Issue 53 has all the details and is in the shops now. I bought my copy on Saturday just to be sure before I put it on my blog. My prize arrived on Thursday and it was fun imagining what I might be able to do with all the goodies! I was especially happy with the Maya Road elements as most of them came in a tin! Don't know which I liked the best the contents or the tin!!!!! What a great Birthday/Christmas present and to cap it all Tim Holtz replied by e-mail (re: my win on 12 tags of Christmas) and actually took the time to say Happy Birthday it does not get much better than that.
I thought I would post details on how I made the card "Heartfelt Christmas Wishes" that is in the issue (and I am sorry to complain but I have to say the colour in the mag makes it look very washed out!), half the job is already done anyway as you had to send in written techniques.
I thought I would post details on how I made the card "Heartfelt Christmas Wishes" that is in the issue (and I am sorry to complain but I have to say the colour in the mag makes it look very washed out!), half the job is already done anyway as you had to send in written techniques.
 Material list:
- K & Co Scrapad to Go Hannah papers red stripe & green tapestry
- Bazzill deep red cardstock
- PDA Crafts stardream, silver mirror, hammered white & countryside recycled chaff cardstock, also smooth ivory paper for insert
- Paperartsy Xmas Plate 1 & 3 “Christmas plum pudding” & “Holly border” stamps
- Adirondack Dye Inks – Bottle, Lettuce & Cranberry
- Papermania mini black sparkle brads
- All My Memories Expressions Accent Charms
- Cream embossed & green mottled cardstock
- Stazon black ink pad
- Plaid All Night Media Chalk
- Create and Craft Adhesive cabochon pearls
- Toilet tissue - Yes you hear right!
- Papercast mould
I designed the church and made a template for all the pieces in my Serif graphics programme then printed these onto the reverse of either hammered white card or deep red which were then cut out with a ruler & craft scalpel knife. I embossed a line on the outer edges of the red elements for a touch of definition before using the decorative scissors to cut the facsia boards, balcony and roof then add tiny pearl cabochons to the circular parts. I stamped the "Christmas plum pudding" word stamp onto the stardream card (it has a lovely shimmer to it) with black Stazon and cut out the arches for the windows and door. I think you can see it quite well here. I marked all the edges with black permanent marker for definition and assemble all the layers with 3D foam pads and silicon glue as necessary. A star punched out of cream embossed card was added to the spire.
 I cut out an oblong of watercolour paper and used Fiskars corner rounder scissors to cut out inverted corners on the top edge. I stamped the holly border using Adirondack bottle ink on the outer edges & lettuce in the centre. After leaving to dry for a short time I then spritzed the whole area with water and used a brush to lift some bottle ink straight from the ink pad lid and added this around the edges of the paper, heavy in places and lighter in others (the colours merge for a mottled affect as long as the whole area is wet). I left to dry off a little and added a touch of the cranberry on the holly berries before leaving to dry completely. I then rubbed the bottle ink pad directly around the edges for some darker definition. I layered the watercolour background firstly onto stardream card (I love PDA Crafts I think it is essential to have a good supply of basic card & paper in lots of different colours to give a professional look to your work and whats more their customer service is excellent!) then silver mirror card, then red stripe paper and lastly green mottled card all of which had the top corners invertly cut with the Fiskars corner rounder scissors. Finally I attached the layered church embellishment and the metal heart.
I folded a piece of A4 chaff cardstock in half to make an A5 portrait card and creased with a bone folder for a crisp edge - actually it is a piece of wood with curved smooth edges, had for years, don't know what it was originally designed for! Perhaps I will take a photo and post it here and someone might be able to tell me? I cut a piece of mottled green card 21cm x 14cm and attached centrally to front of the chaff base card with double sided tape and cut a piece of green tapestry paper 19.7cm x 13.5cm to layer on top of the green.
 The sentiment was printed on stardream card again (font Gigi) and a paper pricked border added along the top and bottom edge using a metal ruler & pricking tool spacing the holes every 2cm. (I only found out the other day that Tim Holtz has a ruler out that has holes already spaced out for this technique. Oh! How I wish I had had one of those!!) This was matted onto a piece of mottled green card and attached to the bottom of the base card with 3D foam pads.
 The decoration on the sentiment is a paper cast moulding which I made by laying toilet tissue, YES toilet tissue!, into a papercast mould wetting each thin layer well with water (about 20) and using a fairly stiff brush to push the tissue into the design, it was then left to dry thoroughly overnight. I bought the mould in Switzerland a good few years ago on a Christmas market trip and have been looking for more ever since. I knew I should have bought more but they were quite expensive! As long as the paper is really dry it will easily come out of the mould. Then all you have to do is trim off the rough edges and chalks were dusted over the design to catch the high spots. I cut two squares of red stripe paper and one of green tapestry each slightly smaller in size and used the corner punch all round. I layered these and added the papercast decoration on top before attaching to the sentiment strip with silicon glue.
 I printed out the insert using my Serif graphics programme (font Gigi) it says "May your Heart and Home be filled with Christmas Cheer"and punched decorative corners before attaching to the inside with double sided tape.
 Hope your week ahead is full of arty luck just as mine has been.
Friday, 5 December 2008
Paperartsy Christmas Card 2008
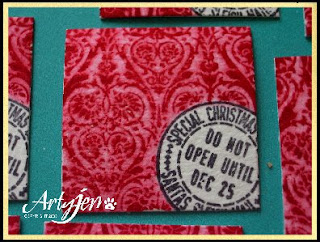
Finished at last, 64 cards done in the end, for Christmas this year. If I get any back now that I wasn't counting on I'm sorry, but you won't be getting one of these! I thought I'd take a few pictures as I went through the process of making them. I started by stamping the main focal point of my card using Paperartsy stamps that I was lucky enough to win a couple of years ago (I just love these stamps). I first used black archival ink (important as it is not effected by water) to stamp the Christmas Delivery stamp from Xmas - Plate 3 in the lower corner of a 3.7cm square piece of heavy watercolour paper, this is important as the next step will not create quite the same effect on other papers. I stamped this image again onto a piece of scrap paper and cut it out to use as a mask to cover up this portion and then used Adirondack cranberry ink to stamp the damask type image from Xmas - Plate 1 over the top. Leave them to dry for a while and lightly paint water over the top, avoiding the delivery stamped area, to create the water coloured effect. (If you paint them straight away the definition is lost in the pattern). Don't they look good all lined up together?

And here is the close up of the image.
 I took a piece of white A4 card and cut in two length ways and scored to make a tent fold card and embossed lines across the bottom and slightly higher up where the focal image was to go. I used Fiskers corner rounder scissors on the bottom edges and then stamped the "tis Christmas" in cranberry again and added a bit of glitter. I actually cut up a stamp to do this, it was a bit scary!
 I think you can probably see the glitter and the embossed lines on here better.
 The stamped focal point was layered onto firstly white card then red card and lastly recycled buff coloured card all edged with a black marker pen. Red raffia was wrapped around the card three times and the focal image attached on top.
 I created an insert in my Serif Drawplus X2 programme and printed it out then used the corner rounder again.
 And here are some of the finished cards.
 Hope everyone likes them as they took me longer to do than I intended.
By the way Tim Holtz is doing his tags of Christmas again this year he has some great tutorials and is giving away some great blog candy just leave a message to be in with a chance.
Have a Christmasy arty weekend.
Monday, 1 December 2008
The Key
I get the chance to practice on men's cards quite a lot as I am surrounded by them at work! Bound to be when you work in the fishing industry. Here is a card I made for my boss last week for his birthday. The key belonged to a padlock that breathed it's last gasp and held some ancient attachment for him and he complained that he did not want to replace it with the shiny new key for the modern replacement lock. I jokingly said we could make the key into a piece of art work and from then on I couldn't stop thinking about it all day and came up with this.
 I used one of my fab new Paperartsy stamps on this (it was in the subscription gift from The Craft Stamper magazine). I used a piece of American Traditional Designs paper called letters & keys as the background for both the main card and the focal image and added the wrought iron stamp around the edges in Distress Ink walnut stain and using a blending tool rubbed a little more around the edges for a graded aged look. I inked the key with Ranger alcohol inks in pesto, espresso and terracotta and attached by using some matching quilting thread to tie around it (you might just make it out on the close up, although it does blend in really well) and a blob of silicon glue at the other end to stop it moving around. I used the same colour alcohol inks on a piece of metal tape and attached the word "explore" on top.

The keyhole is a metal brad off QVC a while back, attached with black brads and I printed out the wording and inked this around the edge to distress as well before matting onto gold mirri card and attaching with the same brads. He seemed to like the result!
Only a few arty weeks till Christmas, must get my cards in the post.
Saturday, 29 November 2008
Little Acorns
The saying goes "Big oaks from little acorns grow". Can you believe that this little lot can turn into 60 Christmas cards?
White A4 base card, squares of watercolour paper, white card, red card and recycled craft card. Three, sorry! four stamps and two ink pads. Black marker pen and red raffia.

I've nearly finished them all now, should be done by tomorrow. So much tactile crafting lately!
White A4 base card, squares of watercolour paper, white card, red card and recycled craft card. Three, sorry! four stamps and two ink pads. Black marker pen and red raffia.

I've nearly finished them all now, should be done by tomorrow. So much tactile crafting lately!
Wednesday, 26 November 2008
Mixed Media Monday
This is the first time entry for me here although I look every week at the blog. It is the time you see, only yesterday it was last Christmas!!
I was inspired by the theme and made the time to do a bit of tactile (as opposed to digital) art.
I was inspired by the theme and made the time to do a bit of tactile (as opposed to digital) art.

The background is from The Graphics Fairy (thank you), there are some great images here to enjoy. I printed off the image and duplicated two more smaller ones at the bottom - spookily it looks as if there is someone looking up, and aged the edges with walnut stain Distress Inks.
I coloured the main eye image iris with stream Adirondack Ink and clear embossed over it. Not sure it shows up too well on this scan. The Gothic arch windows was a picture on the net from who knows where, who knows when now - sorry. I printed it out and cut out the insides of the frame using a craft knife. I inked the frame with scattered straw Distress Inks and printed off the words and coloured with lettuce and cranberry Adirondack Inks - the inside of the O in the word window was coloured with stream Acrylic by Ranger.
Sunday, 23 November 2008
Art Creations Friday
When I saw the image that is the starting point for this new challenge web site one word leapt into my brain, "Beautiful", pretty much says it all! I just had to make something with it so here is my all digital card. Can't wait to see what else happens on Art Creations Friday in the future.

It uses designs by Anne Langpap which were in a free package for Two Peas in a Pod in June 2007. You can still download it here. The only part not by Anne is the distressed antique paper used as a layer behind the image and for the main card layer which was a digital freebie by "Daisy D" on a CD from Scrapbook Magazine a while ago.
To paraphrase good old Brucie on Strictly Come Dancing "Keeeeep Crafting!" and I hope your week is inspirationally arty.
By the way I don't think John should have left the programme. I can understand why he felt he aught to but if the public had voted for him that is all part of the show, isn't it? And now only two people get the chance to dance in the final!!!
Sunday, 9 November 2008
Reject Mystery Card
There were parts of the card that were good and parts that were bad and, seeing as it was for a competition, if there was any bad it had to go.
 I liked the cranberry french dots on the yellow card which were applied with Adirondack Acrylics straight from the bottle. I will certainly use this again on a different project. I liked the disco black embossing on black card on the reverse of the card (using an Anna Griffin background stamp) and I was fairly pleased with the white embossing on black card filled in with Twinkling H2O's. After a couple of failed attempts I was happy with the template I had made to produce the design.
 Have you guessed what it is yet?
 This was my attempt at a Russian Doll! So why was I not happy? Well, the gold embossing had sunk into the red card in places, the black embossing on the bow was a bit dodgy, I wasn't happy with the sentiment part on the reverse and the worst part was that the base black card was proving to be too flimsy with the doll parts attached so I decided to use and extra layer on the reverse and use P.V.A. glue to make sure they were sandwiched together and would not come apart. Unfortunately the two different cards must have reacted with the glue and bent at different rates and no matter what I did (I had them under about 7 editions of an encyclopedia for 5 days) they would not stay straight and I had lost the will by then to make the effort to make another!!
All in all the end result just did not feel quite right so i scrapped it.
Hope you have a successful Arty week.
Saturday, 8 November 2008
On Being Quiet
I know I have been quiet, but have been busy beavering away on my entries for the 2008 Card Designer of the Year competition that's running at SimplyCards & Papercraft. Have just finished taking photo's of them today and got them in the post. Only just in time as the closing date is Thursday 13th Nov!
I wanted all three cards to be just right and was really frustrated when my first idea did not turn out as well as I had hoped. Hence the glimpse of the H20 flowers in October did not make it to the final three. I'll post that card when the light is better to take a picture tomorrow. In the end I am pleased with my cards and can only hope, like everyone else who has entered, that they will catch the judges eye. Can you guess what my reject card might be of from this?

Thursday, 9 October 2008
Theme Thursday - colour purple & 4x4
This is my first post here at Theme Thursday. I have to admit that I don't use this colour very much so it really was a challenge. Luckily I remembered I had this stamp in my stash from a Christmas card sent by my brother-in-law & his wife a couple of years ago, they live in Adelaide. Hope is is purple enough!
 This is a little card that is a mixture of traditional paper & digital (hybrid). I matted & layered a couple of different texture purple card and papers. I then created the background digitally by altering an image of an Australian stamp that had a koala bear on it and then printed it out. I scanned the original envelope that had the purple angel and air mail stamp on it and printed it out at a smaller size to use behind the main image. The main image of the stamp was printed out at a larger size & printed onto photo paper to add a bit of gloss and matted onto a piece of the shiney purple paper.
The kitchen is not far off being finished so perhaps I'll get a bit of crafting in this weekend. Here's to an Arty one!
Wednesday, 8 October 2008
Drink Wine Card
 Just a quick post that I thought might be interesting. If you saw my earlier post for the Arty Girlz challenge #52 this is the same only as a totally digital image. You can see I swapped the music part around (I now remember it was a bit of 7 Gypsies paper I had left over). Sometimes it is quite easy to make a digital and a hybrid project look alike sometimes not. This was one of the easier ones.
Have an Arty day. :)
Tuesday, 7 October 2008
Arty Girlz Challenge # 55 Clip Art
 This weeks challenge at Arty Girlz is to use clip art in your work and amazingly I found nearly all the parts in my project on the Microsoft website. As soon as I saw the ship bow an idea started to form. Please, please tell me it is a Viking ship and not something else!!
The background was left as is with its lovely scrolls in the corners. I extracted the Viking ship from its blue sky background (cutting paper digitally) and made the quotation follow its outline. I digitally cut the compass image with a knife tool to serrate the edges and knocked back the transparency to about 50% to try to replicate vellum and attached it with a couple of staples. The image of the rope was only altered by adding a slight transparency.
I added a bevel & emboss filter effect to some circles for the brads, brushed a pastel effect in blue to grunge the background a bit and added a couple of tattoo type images from my Serif programme to add a salty seafaring touch! Simple I hear you cry, well yes I suppose except that it has taken me two and a half hours to complete. However, during this time, I have been learning as I went. I think it is essential to "Learn something new every day". It is a motto that I like to live to. Have and Arty week and I hope you learn something new today!
Subscribe to:
Comments (Atom)
